这不是我第一次踩这个坑了,因为node不是太常用,有时只是遇到问题了查一下就完了。md,又遇到了,决定记下来
这篇文章是转的
转自
然后,自己可能会改一些东西
开始
我相信你是在使用 pm2 和 log4js 中踩到了坑才会搜素到这篇文章,我便假定你已经对二者都有了基本的了解,遂不再赘述二者的介绍。
pm2 在使用 cluster 模式部署应用时,服务都通过 worker 进程提供,pm2 做为 master 进行监控管理。
由于存在多个 worker 进程,那么我们在使用 log4js 进行日志记录时会有下列疑问:
- 多个
worker进程能否正常写入同一个日志文件 - 要实现 1,
pm2需要作何处理,log4js需要作何处理
退而求其次:多进程分日志?
首先来尝试“逃避”上面的两个问题。
要“逃避”上面疑问最简易的方案就是:每个进程写入自己的日志文件(例如:robotService-worker<id>.log)。只需要对 log4js 做一下简易的设置即可实现:
1 | { |
这个方案带来了日志分散、查阅与处理不方便的问题,一般情况下不采用。此方案较为经典的使用场景是 pomelo 的多进程游戏日志采集
(但 pomelo 不是使用 cluster 来搭建集群)。
log4js 与 pm2 相关源码
lib/log4js 下的 getLogger
1 | /** |
说明 log4js 在 cluster 集群模式下与单进程模式(isMaster 方法来区分)下获取 logger 的存在差异。
我们关注到 log4js 在 worker 进程下执行的是 workerDispatch。
下面是 isMaster 的源码:
1 | function isPM2Master() { |
说明 log4js 对普通的 cluster 模式和 pm2 的 cluster 模式又做了区分。我们留意到有两个可配置项:pm2 pm2InstanceVar,
可以查看 log4js 的文档了解这两个配置项。
继续看 workerDispatch 的源码:
1 | function workerDispatch(logEvent) { |
我们可以得知:在 pm2 cluster 模式下,log4js 不在 worker 进程直接记录日志,而是将需要记录日志的消息发送给 master 进程。
log4js 既然有发送消息的代码,那肯定有接收消息的代码,下面是接收消息的代码:
1 | function configure(configurationFileOrObject) { |
也就是日志是由 worker –①–> pm2 master –②–> worker 进行的传递,其思路就是日志只由一个 worker 去记录。
而 ② 处的转发以及选择哪一个 worker 去接收就需要 pm2-intercom 这个 pm2 的 module 来处理了。
结论
要解决前言中的两个疑问,可以这样做:
pm2安装pm2 install pm2-intercomlog4js启用以下配置:
1 | { |
结束了?
没有。
在上面的代码中我们发现 isPM2Master 的判断中有这样一句代码:process.env[config.pm2InstanceVar] === '0'。
我们查阅 pm2 的文档发现,pm2 的进程都是有编号的,默认使用 NODE_APP_INSTANCE 环境变量(可以自己配置指定)上标识是 master(=== ‘0’) 还是 worker。log4js 也是根据这个特征来实现 isPM2Master 检测。
但是 pm2 不一定使用默认的 NODE_APP_INSTANCE 环境变量来编号,
可能会变化——可能是用户自己定义了其他名称(例如node-config 将这个环境变量字段占用了,pm2 只能改用其他的),
所以当 pm2 改变了字段名时,log4js 要做相应的配置:
1 | { |
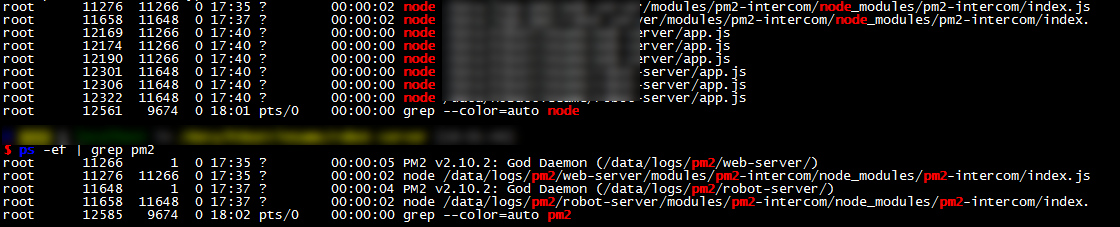
附赠:单机多 pm2 实例
一台机器上可以部署多个 pm2 实例,这在我们需要再一台机器上部署多个不同的服务时可以用到,
例如我们可能同时在一台机器上部署 web-server和 api-server(因为机器紧张等原因)。
当我们第一次调用 pm2 时,我们会发现 $HOME/.pm2 目录被创建,里面存储着 (该)pm2 实例 的运行信息和日志输出。
1 |
|
1 | [admin@sypt_web-test_10.0.3.188 .pm2]# pwd |
所以要创建多个 pm2 实例就需要每个实例使用不同的目录来存储运行信息。pm2 使用 PM2_HOME 环境变量来识别存储运行信息的目录:
1 | PM2_HOME='/path/to/pm2/web-server/' pm2 start app.js -i --name=web-server |
1 | PM2_HOME='/path/to/pm2/api-server/' pm2 start app.js -i --name=api-server |
为特定的 pm2 实例安装模块:
1 | PM2_HOME='/path/to/pm2/web-server/' pm2 install pm2-intercom |
Tip:pm2 模块的安装可以不使用线上下载安装的方式(例如不方便执行 pm2 install 操作时),
你只需要将模块放到 modules 目录下,然后修改 module_conf.json 注册模块即可。
1 | . |
1 | // module_conf.json |